The FX-Map is the muscle behind many of the powerful nodes that come with Substance Designer. It's used in pretty much all of the nodes that take an input and scatter it around, like the Tile Sampler and Splatter nodes. Some people use it to create custom scatter behaviors, but I mostly use it for generating noise patterns, so that's what i'm going to talk about in this post. But first, lets look at what Allegorithmic says about the FX-Map so we can all get a baseline understanding of it.

From Allegorithmic's Substance Designer documentation on the FX-Map:
The most common uses of FX-Maps are creating repetitive patterns, such as stripes and bricks, and noises, such as Perlin, Brownian and Gaussian noises. Noises are particularly useful in creating organic, natural-looking textures like dirt, dust, concretes, stone surfaces, liquid spatters and so on.
An FX-Map graph can contain one or more of the three FX-Map node types: Quadrant, Iterate and Switch. Of these nodes, the one you will likely use most often is the Quadrant, with the Iterate node a close second.
The [Quadrant] node is the prime mover of FX-Maps. It creates the core region quad-tree graph FX-Maps rely on, but it is not displayed as one. Visually, the quad-tree graph is shown in the form of a Markov Chain.
When rendering the FX-Map, the simplified FX-Map graph is ‘unwrapped’ to look like the big tree-like graph. The engine “walks” the entire quad-tree, working top to bottom, then left to right.
FX-Map nodes don’t blindly copy and paste their images. When each image is rendered, any dynamic functions it has are run. The functions affect each image rendered by the node. You can therefore give each individual image a random rotation, or scale factor, or a number of other adjustments.
They then goes on to give a short description of the 3 nodes that you can use inside an FX-Map node:
Quadrant
This splits the image at this step in the graph into four quadrants. This is the most common node type. A chain of Quadrant nodes can create very complex-looking images, as well as intricate patterns.
In fact, Quadrant nodes represent a level—or octave—in a quad-tree graph. FX-Map graphs hide this tree structure by representing each level in the tree with a single Quadrant: every time you connect one Quadrant node to another, you are actually creating a complete tree level. The reason for this 'cheat' technique is to remove the need to represent each node at every level of a tree individually: after just four layers of depth, you would need to use 4 x 4 x 4 x 4 nodes, which is 256 individual nodes! Instead, each Quadrant node "knows" which level it's at in the tree and generates its imagery accordingly.
Iterate
Repeats the image passed into the right-hand connector over the image passed into the left-hand connector by the set number of iterations. This node is most often used with one or more Dynamic Functions graphs to move or rotate the input image in some way at each iteration.
Switch
This takes two inputs and simply switches between one or the other, as defined by its Selector setting. As with the Iterate node, the Selector setting is often chosen by a Dynamic Function.
The FX-Map sub-node that i want to focus on for this post is the Quadrant node. Specifically, i want to focus on it's ability to create Brownian noises. The quadrant lets us create a very similar form of Fractal Brownian Motion, or "fBm" for short. The difference between our noise and traditional fBM noise is that our noise will reuse the same noise map in all of its octaves, instead of resampling the noise with different parameters for each octave.
In my opinion, this technique is incredibly useful for creating realisitc textures. So lets dive into how to make it.
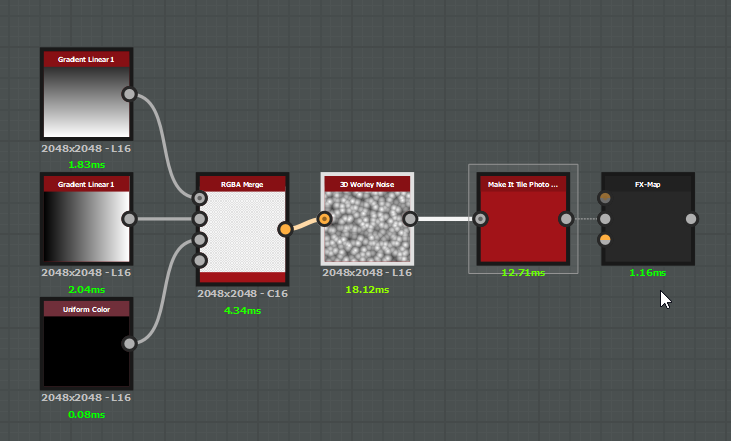

The above images shows the initial setup i'm using. The right image shows the properties of my FX-Map. I'm using two Gradient Linear 1 nodes at different rotations and a Uniform Color (set to grayscale) node set to black. I then plug those into the RGBA Merge which will act as the 3D Coordinates that the 3D Worley Noise needs to do its thing. The 3D Worley Noise's properties are all default other than the scale parameter, which is set to 16.0. I plug that into a Make It Tile Photo (with default settings) to help reduce any seam artifacts that might come about from the fBm generation, which then goes into the FX-Map's Input Image 0 slot. The only thing I've done in the FX-Map at this point is set its Color Mode to "Grayscale". If you plug in a Grayscale input and leave it as Color, nothing will show up.
Now that the setup is complete, go ahead and double click the the FX-Map node to preview its output, then hit Ctrl+E to dive into the sub-graph. The first thing you'll see is a Quadrant node. Click on it, and go into the properties and set the Pattern mode to "Input Image". If you've done things correctly, you'll see the Input Image 0 as the output preview. Copy paste the Quadrant node and move it underneath the original one, then connect all four of the original nodes' outputs to the new node's input. Then go into the new node and set the Pattern rotation property to 90 Degrees. For each new Quadrant node we add, we'll increment the degrees by 90. We'll do this 3 more times until we have a 5 node chain. In other words, we'll be creating 5 "Octaves". When you're done, double click the background of the FX-Map to display the global properties of the FX-Map. At the bottom, find the "Roughness" (no, it's not related to the roughness you're probably thinking about) property, and slide it back and forth to get an idea of what the property does. I usually set this value to around 0.5. When your done, your graph should look similar to below:

So, why should i use this method when i could just set up a chain of transform nodes to do pretty much the same thing? Well... for one, it's fast. at 2048 res, the FX-Map node is only taking about 0.47 ms on my machine to compute, which makes it a great candidate for packaging it up for use in Substance Painter. Also, that "Roughness" parameter is amazing for tweaking your noise to get different levels of frequency. Setting up that behavior on a custom chain would be really tedious.
I'm not done with this yet, however. I want to show you what you can do with this once the setup is complete. Go ahead and pop back into your main substance graph, and lets check out the 3D Worley Noise node. You might be wondering why I've chosen to use this node instead of one of the Cells nodes or a simple Perline Noise node. While those nodes would be useful and legitimate to use, i like the 3D Worley Noise node because it's packed with cool parameters to get a wide variety of shapes. There's a bunch of different noise "Modes" contained in the properties, all with several "Styles" to choose from.
I'm going to go over the different Worley Noise modes. Euclidian will give you a bunch of cone shapes. Manhattan's gives you pyramids rotated at a 45 degree angle. Chebyshev gives you pyramids, but with the added feature of having them "sliced" to allow for flat sections of the noise. And then there's good ol' Minkowski (a bit of an over-achiever, if you ask me). Minkowski noise comes with a special property called the Minkowski Number. Depending on this number, you can get shapes that pretty much look identical all 3 of the previous noise modes, with the exception of Minkowski 1.0, which looks to have a greater range than Manhattan does.


Go ahead and try changing some of the Worley Noise properties. Try setting the mode to Minkowski and playing with the Minkowski Number and diffrent Styles. You'll see that you can get some pretty interesting noises as a result. In the below gif, i'm using a simple preview to see what my noise would do with some AO, Height, Curvature, and Normal information.
Doing some simple Levels adjustments to the output can yield some nice results as well.
Not only does fBm noise serve well as height information - it also can act as a mask for many organic effects. In the below example i'm using Minkowski 2.0 with the F2-F1 Style and a Roughness of around 0.2 to generate an alpha decay mask.
When using this mask as the base to a paint peeling effect, you can get some really cool results.
Tweaking the Minkowski number, inverting the output or changing the mode of the Worley noise will give you a completely different feel. I could make a few tweaks to go from a flaky, cracked paint to a blistering, corroding paint.
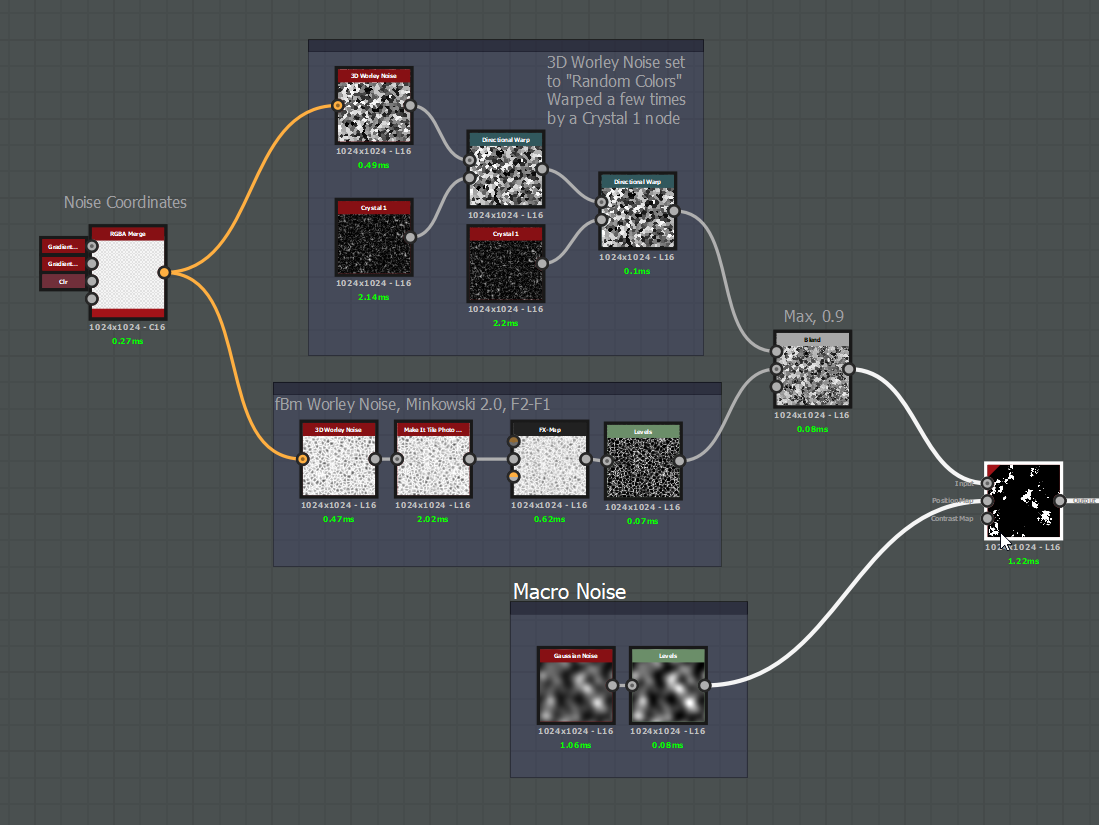
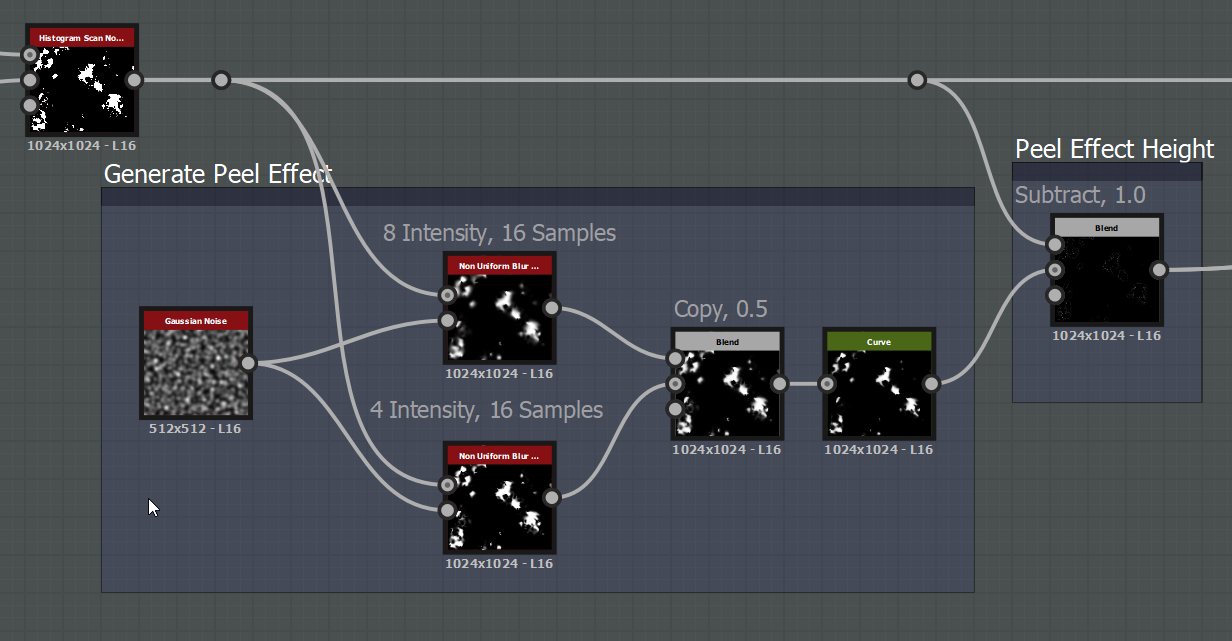
Below are a few shots of the node chain i'm using to generate the mask and the peel effect. The rest of the stuff is just boiler plate material blending, nothing too special going on.
The take away from all of this is fBm noise is extremely useful and pretty easy to make in Substance Designer. I encourage you to try experimenting by substituting Worley 3D Noise with some other things like Gaussian Noise, or use a combination of the Shape and Splatter nodes. You'll get very detailed noise maps that you should be able to use for many, many effects.